> ## Documentation Index
> Fetch the complete documentation index at: https://unstructured-53-docs-243-plugins.mintlify.site/llms.txt
> Use this file to discover all available pages before exploring further.
# VectorShift
[VectorShift](https://vectorshift.ai/) is an integrated framework of no-code, low-code, and out of the box generative AI solutions
to build AI search engines, assistants, chatbots, and automations.
VectorShift's platform allows you to design, prototype, build, deploy,
and manage generative AI workflows and automation across two interfaces: no-code and code SDK.
This hands-on demonstration uses the no-code interface to walk you through creating a VectorShift pipeline project. This project
enables you to use GPT-4o-mini to chat in real time with a PDF document that is processed by Unstructured and has its processed data stored in a
[Pinecone](https://www.pinecone.io/) vector database.
## Prerequisites
* A Pinecone account. [Get an account](https://app.pinecone.io/).
* A Pinecone API key. [Get an API key](https://docs.pinecone.io/guides/get-started/authentication#find-your-pinecone-api-key).
* A Pinecone serverless index. [Create a serverless index](https://docs.pinecone.io/guides/indexes/create-an-index).
Unstructured recommends that all records in the target index have a field
named `record_id` with a string data type.
Unstructured can use this field to do intelligent document overwrites. Without this field, duplicate documents
might be written to the index or, in some cases, the operation could fail altogether.
Also:
* [Sign up for an OpenAI account](https://platform.openai.com/signup), and [get your OpenAI API key](https://help.openai.com/en/articles/4936850-where-do-i-find-my-openai-api-key).
* [Sign up for a VectorShift Starter account](https://app.vectorshift.ai/api/signup).
* Sign up for an Unstructured account:
1. Go to [https://platform.unstructured.io](https://platform.unstructured.io) and use your email address, Google account, or GitHub account to
sign up for an Unstructured account (if you do not already have one) and sign into the account at the same time. The
[Unstructured user interface (UI)](/ui/overview) appears, and you can start using it right away.
2. If you also want to use the [Unstructured API](/api-reference/overview) later, you must get your API key first:
a. In the Unstructured UI, click **API Keys** on the sidebar.
b. Click **Generate API Key**.
c. Follow the on-screen instructions to finish generating the key.
d. Click the **Copy** icon next to your new key to add the key to your system's clipboard. If you lose this key, simply return and click the **Copy** icon again.
By following the preceding instructions, you are signed up for a [Developer](https://unstructured.io/developers) pay per page account by default.
To save money, consider switching to a [Subscribe & Save](https://unstructured.io/subscribeandsave) account instead. To save even more money,
consider switching to an [Enterprise](https://unstructured.io/enterprise) account instead.
## Create and run the demonstration project
Although you can use any [supported file type](/ui/supported-file-types) or data in any
[supported source type](/ui/sources/overview) for the input into Pinecone, this demonstration uses [the text of the United States Constitution in PDF format](https://constitutioncenter.org/media/files/constitution.pdf).
1. Sign in to your Unstructured account.
2. [Create a source connector](/ui/sources/overview), if you do not already have one, to connect Unstructured to the source location where the PDF file is stored.
3. [Create a Pinecone destination connector](/ui/destinations/pinecone), if you do not already have one, to connect Unstructured to your Pinecone serverless index.
4. [Create a workflow](/ui/workflows#create-a-workflow) that references this source connector and destination connector.
5. [Run the workflow](/ui/workflows#edit-delete-or-run-a-workflow).
1. Sign in to your VectorShift account dashboard.
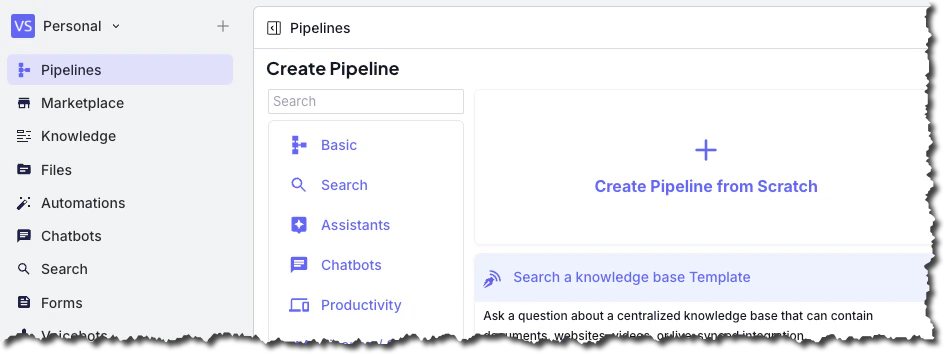
2. On the sidebar, click **Pipelines**.
3. Click **New**.
4. Click **Create Pipeline from Scratch**.
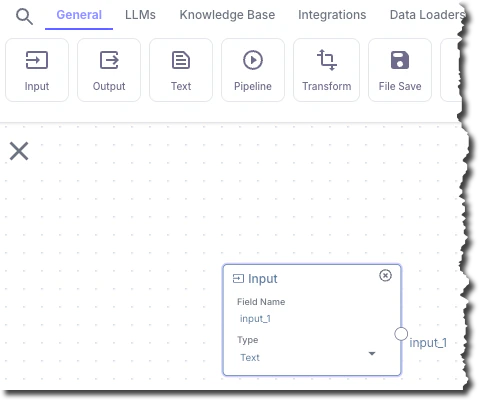
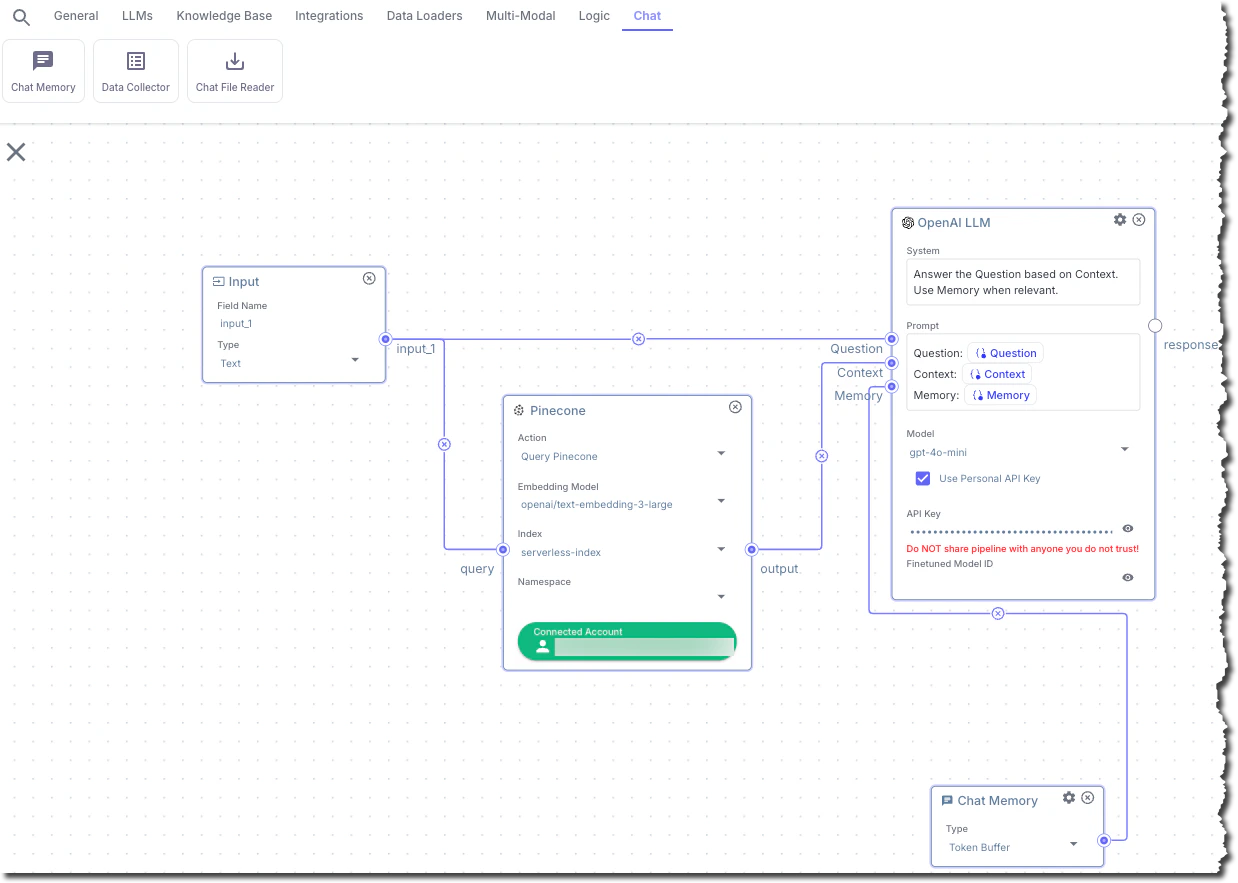
In this step, you add a node to the pipeline. This node takes user-supplied chat messages and sends them as input to Pinecone, and as input to a text-based LLM, for contextual searching.
In the top pipeline node chooser bar, on the **General** tab, click **Input**.
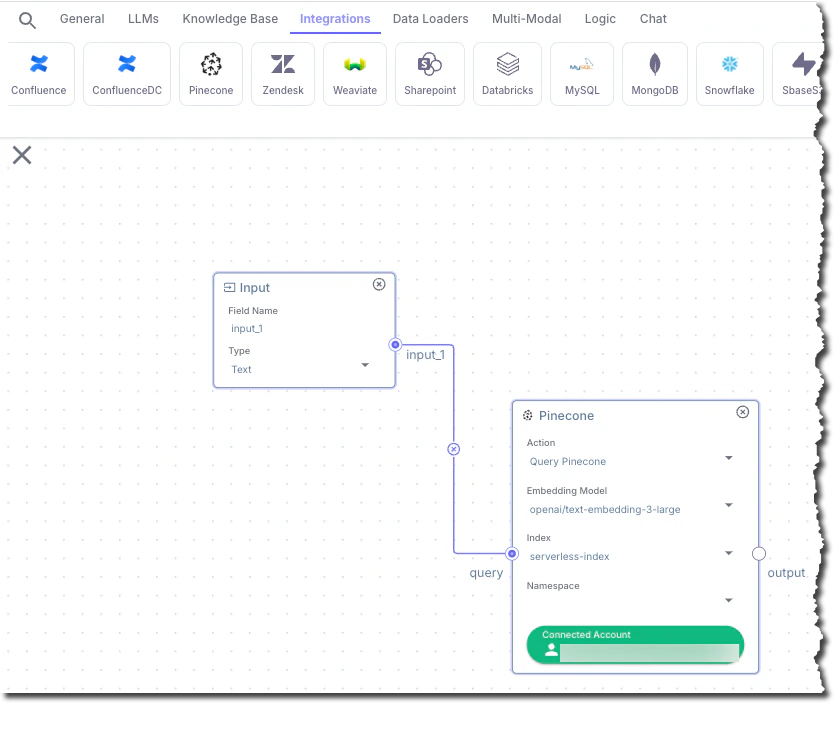
In this step, you add a node that connects to the Pinecone serverless index.
1. In the top pipeline node chooser bar, on the **Integrations** tab, click **Pinecone**.
2. In the **Pinecone** node, for **Embedding Model**, select **openai/text-embedding-3-large**.
3. Click **Connected Account**.
4. In the **Select Pinecone Account** dialog, click **Connect New**.
5. Enter the **API Key** and **Region** for your Pinecone serverless index, and then click **Save**.
6. For **Index**, selet the name of your Pinecone serverless index.
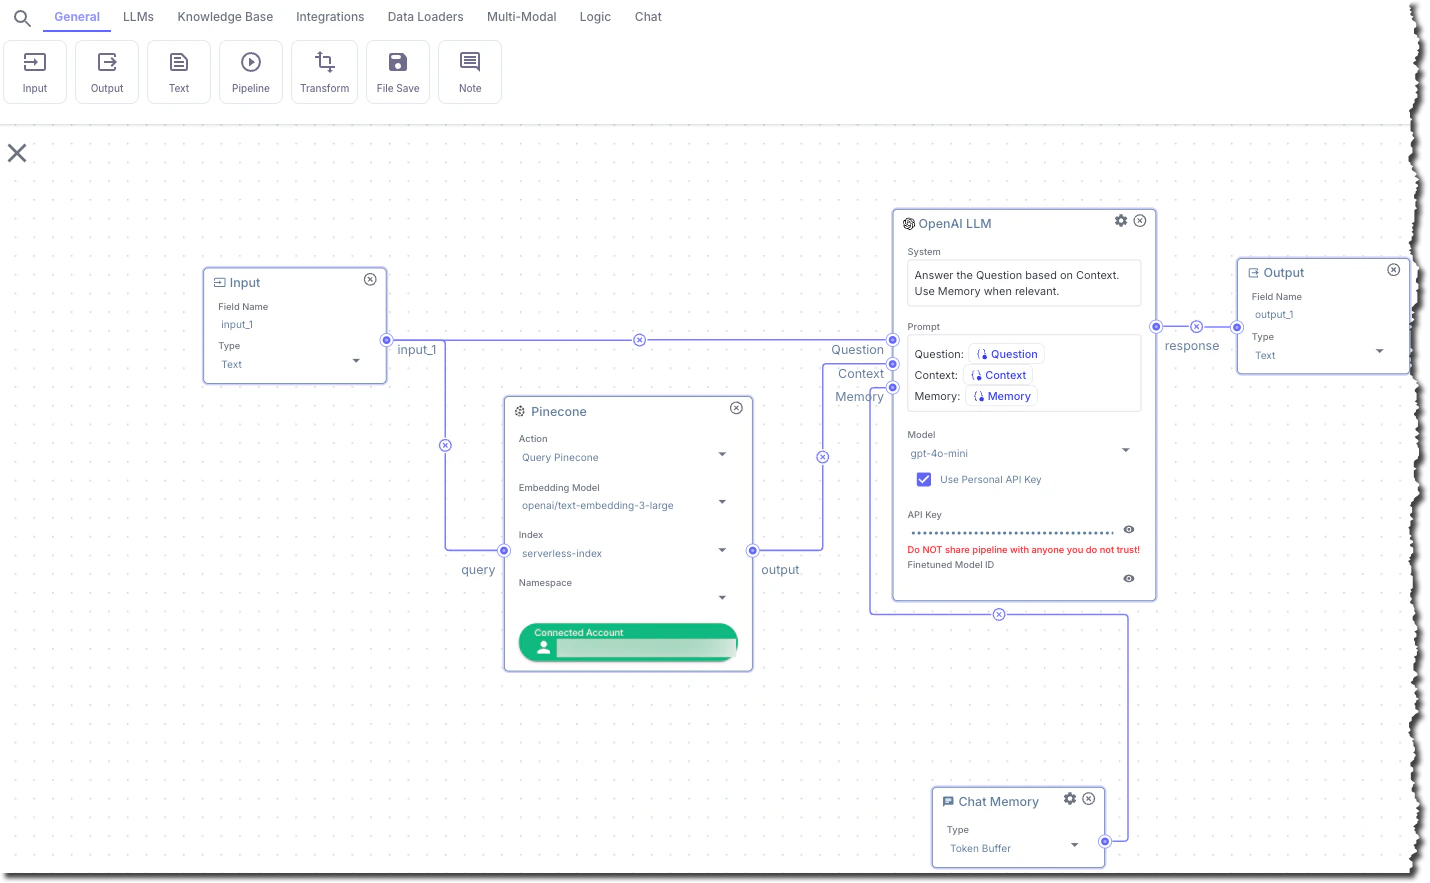
7. Connect the **input\_1** output from the **Input** node to the **query** input in the **Pinecone** node.
To make the connection, click and hold your mouse pointer inside of the circle next to **input\_1** in the **Input** node.
While holding your mouse pointer, drag it over into the circle next to **query** in the **Pinecone** node. Then
release your mouse pointer. A line appears between these two circles.
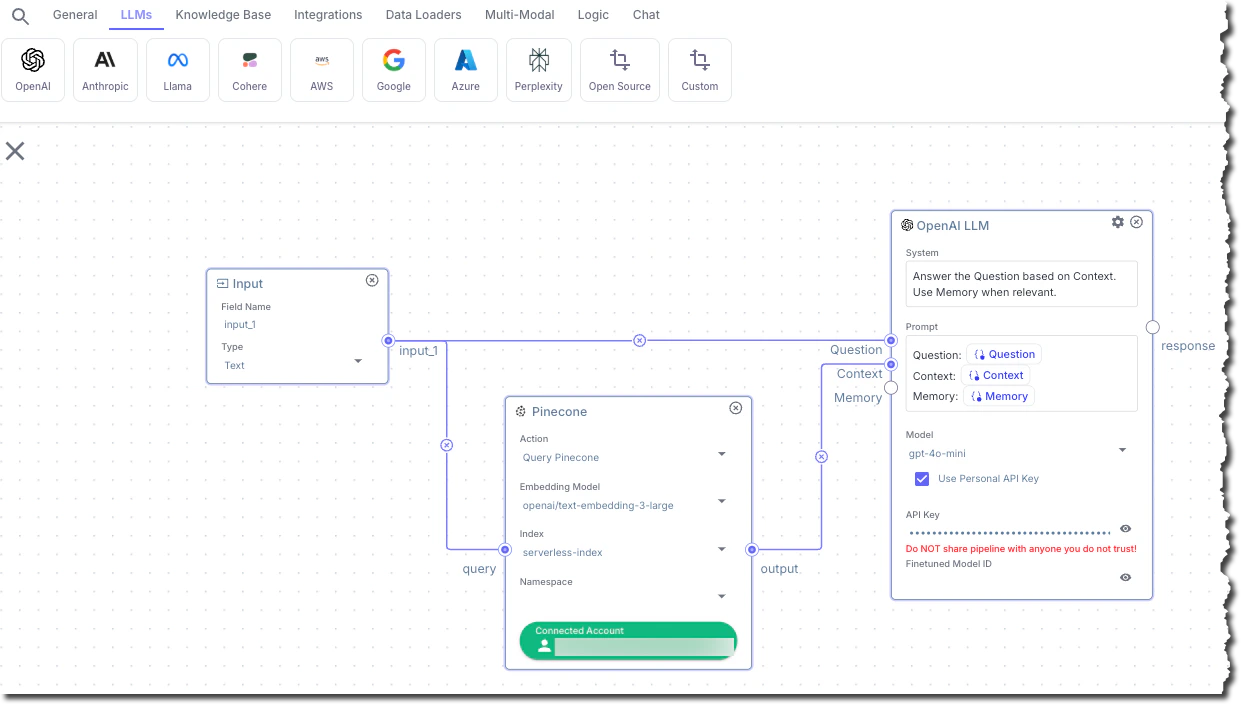
In this step, you add a node that builds a prompt and then sends it to a text-based LLM.
1. In the top pipeline node chooser bar, on the **LLMs** tab, click **OpenAI**.
2. In the **OpenAI LLM** node, for **System**, enter the following text:
```
Answer the Question based on Context. Use Memory when relevant.
```
To answer the question, the preceding prompt uses the context along with general information that the text-based LLM is
trained on. To use only the context to answer the question, you can change the prompt, for example to something like this:
```text theme={null}
Answer the Question based only on the Context. Do not use any other sources of
information. If the context does not provide enough information to answer the
question, reply with 'I do not have enough context to answer the question.'
Use Memory when relevant.
```
3. For **Prompt**, enter the following text:
```
Question: {{Question}}
Context: {{Context}}
Memory: {{Memory}}
```
4. For **Model**, select **gpt-4o-mini**.
5. Check the box titled **Use Personal API Key**.
6. For **API Key**, enter your OpenAI API key.
7. Connect the **input\_1** output from the **Input** node to the **Question** input in the **OpenAI LLM** node.
8. Connect the **output** output from the **Pinecone** node to the **Context** input in the **OpenAI LLM** node.
In this step, you add a node that adds chat memory to the session.
1. In the top pipeline node chooser bar, on the **Chat** tab, click **Chat Memory**.
2. Connect the output from the **Chat Memory** node to the **Memory** input in the **OpenAI LLM** node.
In this step, you add a node that displays the chat output.
1. In the top pipeline node chooser bar, on the **General** tab, click **Output**.
2. Connect the **response** output from the **OpenAI LLM** node to the input in the **Output** node.
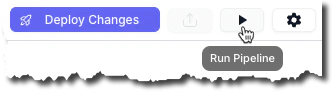
1. In the upper corner of the pipeline designer, click the play (**Run Pipeline**) button.
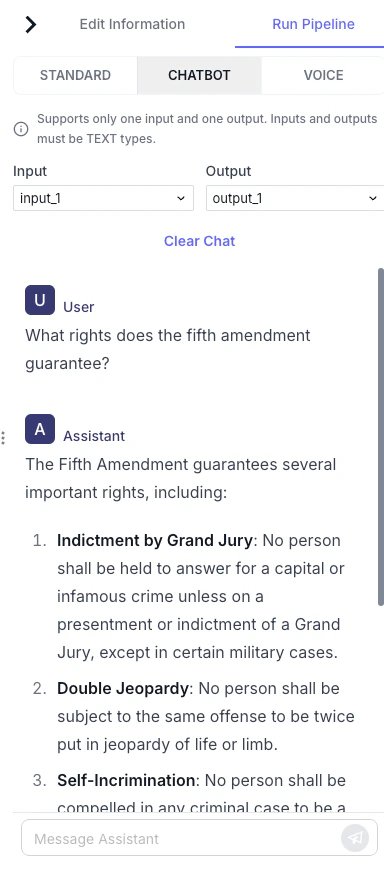
2. In the chat pane, on the **Chatbot** tab, enter a question into the **Message Assistant** box, for example, `What rights does the fifth amendment guarantee?` Then press the send button.
3. Wait until the answer appears.
4. Ask as many additional questions as you want to.
## Learn more
See the [VectorShift documentation](https://docs.vectorshift.ai/).
 2. In the chat pane, on the **Chatbot** tab, enter a question into the **Message Assistant** box, for example, `What rights does the fifth amendment guarantee?` Then press the send button.
 3. Wait until the answer appears.
4. Ask as many additional questions as you want to.
3. Wait until the answer appears.
4. Ask as many additional questions as you want to.