> ## Documentation Index
> Fetch the complete documentation index at: https://unstructured-53-docs-243-plugins.mintlify.site/llms.txt
> Use this file to discover all available pages before exploring further.
# Workflows
## Workflows dashboard
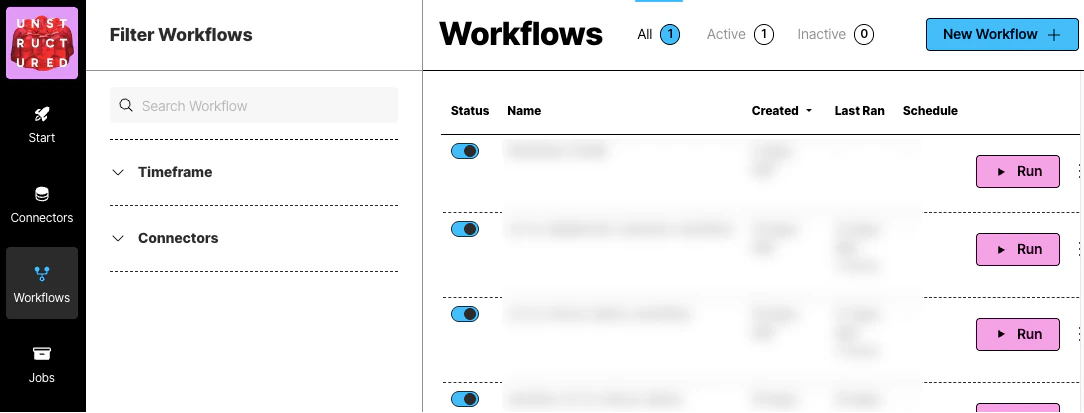 To view the workflows dashboard, on the sidebar, click **Workflows**.
A workflow in Unstructured is a defined sequence of processes that automate the data handling from source to destination. It allows users to configure how and when data should be ingested, processed, and stored.
Workflows are crucial for establishing a systematic approach to managing data flows within the platform, ensuring consistency, efficiency, and adherence to specific data processing requirements.
## Create a workflow
Unstructured provides two types of workflow builders:
* [Automatic](#create-an-automatic-workflow) or **Build it For Me** workflows, which use sensible default workflow settings to enable you to get good-quality results faster.
* [Custom](#create-a-custom-worklow) or **Build it Myself** workflows, which enable you to fine-tune the workflow settings behind the scenes to get very specific results.
### Create an automatic workflow
You must first have an existing source connector and destination connector to add to the workflow.
If you do not have an existing connector for either your target source (input) or destination (output) location, [create the source connector](/ui/sources/overview), [create the destination connector](/ui/destinations/overview), and then return here.
To see your existing connectors, on the sidebar, click **Connectors**, and then click **Sources** or **Destinations**.
To create an automatic workflow:
1. On the sidebar, click **Workflows**.
2. Click **New Workflow**.
3. Next to **Build it for Me**, click **Create Workflow**.
If a radio button appears instead of **Build it for Me**, select it, and then click **Continue**.
4. For **Workflow Name**, enter some unique name for this workflow.
5. In the **Sources** dropdown list, select your source location.
6. In the **Destinations** dropdown list, select your destination location.
You can select multiple source and destination locations. Files will be ingested from all of the selected source locations, and the processed data will be delivered to all of the selected destination locations.
7. Click **Continue**.
8. The **Reprocess All** box applies only to blob storage connectors such as the Amazon S3, Azure Blob Storage, and Google Cloud Storage connectors:
* Checking this box reprocesses all documents in the source location on every workflow run.
* Unchecking this box causes only new documents that are added to the source location since the last workflow run to be processed on future runs. Previously processed documents are not processed again, even if those documents' contents change.
9. Click **Continue**.
10. If you want this workflow to run on a schedule, in the **Repeat Run** dropdown list, select one of the scheduling options, and fill in the scheduling settings. Otherwise, select **Don't repeat**.
11. Click **Complete**.
By default, this workflow partitions, chunks, and generates embeddings as follows:
* **Partitioner**: **Auto** strategy
Unstructured automatically analyzes and processes files on a page-by-page basis (for PDF files) and on a document-by-document basis for everything else:
* If the page or document has no images and likely does not have tables, **Fast** partitioning is used, and the page or document is billed at the **Fast** rate for processing.
* If the page or document has only a few tables or images with standard layouts and languages, **High Res** partitioning is used, and the page or document is billed at the **High Res** rate for processing.
* If the page or document has more than a few tables or images, **VLM** partitioning is used, and the page or document is billed at the **VLM** rate for processing.
[Learn about partitioning strategies](/ui/partitioning).
* **Chunker**: **Chunk by Title** strategy
* **Contextual Chunking**: No (unchecked)
* **Combine Text Under N Characters**: 3000
* **Include Original Elements**: Yes (checked)
* **Max Characters**: 5500
* **Multipage Sections**: Yes (checked)
* **New After N Characters**: 3500
* **Overlap**: 350
* **Overlap All**: Yes (checked)
[Learn about chunking strategies](/ui/chunking).
* **Embedder**:
* **Provider**: Azure OpenAI
* **Model**: text-embedding-3-large, with 3072 dimensions
[Learn about embedding providers and models](/ui/embedding).
* **Enrichments**:
This workflow contains no enrichments.
[Learn about available enrichments](/ui/enriching/overview).
After this workflow is created, you can change any or all of its settings if you want to. This includes the workflow's
source connector, destination connector, partitioning, chunking, and embedding settings. You can also add enrichments
to the workflow if you want to.
To change the workflow's default settings or to add enrichments:
1. On the sidebar, click **Workflows**.
2. In the list of available workflows, click the workflow that was just created. This opens a visual designer that shows
your workflow as a directed acyclic graph (DAG). This DAG contains a node representing each step in the workflow.
There is one node for the partitioning step, another node for the chunking step, and so on.
3. To learn how to change a node's settings or to add enrichment nodes, click the **FAQ** button in the flyout pane in
the workflow DAG designer.
If you did not previously set the workflow to run on a schedule, you can [run the worklow](#edit-delete-or-run-a-workflow) now.
### Create a custom workflow
If you already have an existing workflow that you want to change, do the following:
1. On the sidebar, click **Workflows**.
2. Click the name of the workflow that you want to change.
3. Skip ahead to Step 11 in the following procedure.
You must first have an existing source connector and destination connector to add to the workflow.
If you do not have an existing connector for either your target source (input) or destination (output) location, [create the source connector](/ui/sources/overview), [create the destination connector](/ui/destinations/overview), and then return here.
To see your existing connectors, on the sidebar, click **Connectors**, and then click **Sources** or **Destinations**.
1. On the sidebar, click **Workflows**.
2. Click **New Workflow**.
3. Click the **Build it Myself** option, and then click **Continue**.
4. In the **This workflow** pane, click the **Details** button.
To view the workflows dashboard, on the sidebar, click **Workflows**.
A workflow in Unstructured is a defined sequence of processes that automate the data handling from source to destination. It allows users to configure how and when data should be ingested, processed, and stored.
Workflows are crucial for establishing a systematic approach to managing data flows within the platform, ensuring consistency, efficiency, and adherence to specific data processing requirements.
## Create a workflow
Unstructured provides two types of workflow builders:
* [Automatic](#create-an-automatic-workflow) or **Build it For Me** workflows, which use sensible default workflow settings to enable you to get good-quality results faster.
* [Custom](#create-a-custom-worklow) or **Build it Myself** workflows, which enable you to fine-tune the workflow settings behind the scenes to get very specific results.
### Create an automatic workflow
You must first have an existing source connector and destination connector to add to the workflow.
If you do not have an existing connector for either your target source (input) or destination (output) location, [create the source connector](/ui/sources/overview), [create the destination connector](/ui/destinations/overview), and then return here.
To see your existing connectors, on the sidebar, click **Connectors**, and then click **Sources** or **Destinations**.
To create an automatic workflow:
1. On the sidebar, click **Workflows**.
2. Click **New Workflow**.
3. Next to **Build it for Me**, click **Create Workflow**.
If a radio button appears instead of **Build it for Me**, select it, and then click **Continue**.
4. For **Workflow Name**, enter some unique name for this workflow.
5. In the **Sources** dropdown list, select your source location.
6. In the **Destinations** dropdown list, select your destination location.
You can select multiple source and destination locations. Files will be ingested from all of the selected source locations, and the processed data will be delivered to all of the selected destination locations.
7. Click **Continue**.
8. The **Reprocess All** box applies only to blob storage connectors such as the Amazon S3, Azure Blob Storage, and Google Cloud Storage connectors:
* Checking this box reprocesses all documents in the source location on every workflow run.
* Unchecking this box causes only new documents that are added to the source location since the last workflow run to be processed on future runs. Previously processed documents are not processed again, even if those documents' contents change.
9. Click **Continue**.
10. If you want this workflow to run on a schedule, in the **Repeat Run** dropdown list, select one of the scheduling options, and fill in the scheduling settings. Otherwise, select **Don't repeat**.
11. Click **Complete**.
By default, this workflow partitions, chunks, and generates embeddings as follows:
* **Partitioner**: **Auto** strategy
Unstructured automatically analyzes and processes files on a page-by-page basis (for PDF files) and on a document-by-document basis for everything else:
* If the page or document has no images and likely does not have tables, **Fast** partitioning is used, and the page or document is billed at the **Fast** rate for processing.
* If the page or document has only a few tables or images with standard layouts and languages, **High Res** partitioning is used, and the page or document is billed at the **High Res** rate for processing.
* If the page or document has more than a few tables or images, **VLM** partitioning is used, and the page or document is billed at the **VLM** rate for processing.
[Learn about partitioning strategies](/ui/partitioning).
* **Chunker**: **Chunk by Title** strategy
* **Contextual Chunking**: No (unchecked)
* **Combine Text Under N Characters**: 3000
* **Include Original Elements**: Yes (checked)
* **Max Characters**: 5500
* **Multipage Sections**: Yes (checked)
* **New After N Characters**: 3500
* **Overlap**: 350
* **Overlap All**: Yes (checked)
[Learn about chunking strategies](/ui/chunking).
* **Embedder**:
* **Provider**: Azure OpenAI
* **Model**: text-embedding-3-large, with 3072 dimensions
[Learn about embedding providers and models](/ui/embedding).
* **Enrichments**:
This workflow contains no enrichments.
[Learn about available enrichments](/ui/enriching/overview).
After this workflow is created, you can change any or all of its settings if you want to. This includes the workflow's
source connector, destination connector, partitioning, chunking, and embedding settings. You can also add enrichments
to the workflow if you want to.
To change the workflow's default settings or to add enrichments:
1. On the sidebar, click **Workflows**.
2. In the list of available workflows, click the workflow that was just created. This opens a visual designer that shows
your workflow as a directed acyclic graph (DAG). This DAG contains a node representing each step in the workflow.
There is one node for the partitioning step, another node for the chunking step, and so on.
3. To learn how to change a node's settings or to add enrichment nodes, click the **FAQ** button in the flyout pane in
the workflow DAG designer.
If you did not previously set the workflow to run on a schedule, you can [run the worklow](#edit-delete-or-run-a-workflow) now.
### Create a custom workflow
If you already have an existing workflow that you want to change, do the following:
1. On the sidebar, click **Workflows**.
2. Click the name of the workflow that you want to change.
3. Skip ahead to Step 11 in the following procedure.
You must first have an existing source connector and destination connector to add to the workflow.
If you do not have an existing connector for either your target source (input) or destination (output) location, [create the source connector](/ui/sources/overview), [create the destination connector](/ui/destinations/overview), and then return here.
To see your existing connectors, on the sidebar, click **Connectors**, and then click **Sources** or **Destinations**.
1. On the sidebar, click **Workflows**.
2. Click **New Workflow**.
3. Click the **Build it Myself** option, and then click **Continue**.
4. In the **This workflow** pane, click the **Details** button.
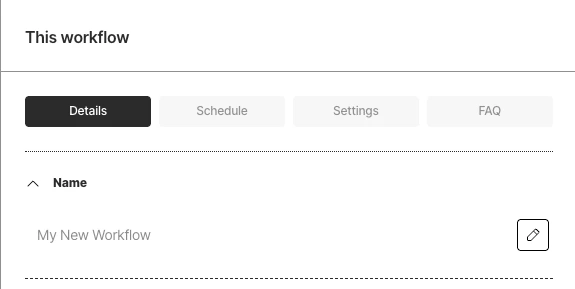 5. Next to **Name**, click the pencil icon, enter some unique name for this workflow, and then click the check mark icon.
6. If you want this workflow to run on a schedule, click the **Schedule** button. In the **Repeat Run** dropdown list, select one of the scheduling options, and fill in the scheduling settings.
7. To overwrite any previously processed files, or to retry any documents that fail to process, click the **Settings** button, and check either or both of the boxes.
The **Reprocess All** box applies only to blob storage connectors such as the Amazon S3, Azure Blob Storage, and Google Cloud Storage connectors:
* Checking this box reprocesses all documents in the source location on every workflow run.
* Unchecking this box causes new documents that have been added to the source location, as well as existing documents in the source location that have had their contents or titles changed, since the last workflow run to be processed on future runs. Other previously processed documents are not processed again.
8. The workflow begins with the following layout:
```mermaid theme={null}
flowchart LR
Source-->Partitioner-->Destination
```
The following workflow layouts are also valid:
```mermaid theme={null}
flowchart LR
Source-->Partitioner-->Chunker-->Destination
```
```mermaid theme={null}
flowchart LR
Source-->Partitioner-->Chunker-->Embedder-->Destination
```
```mermaid theme={null}
flowchart LR
Source-->Partitioner-->Enrichment-->Chunker-->Destination
```
```mermaid theme={null}
flowchart LR
Source-->Partitioner-->Enrichment-->Chunker-->Embedder-->Destination
```
9. In the pipeline designer, click the **Source** node. In the **Source** pane, select the source location. Then click **Save**.
5. Next to **Name**, click the pencil icon, enter some unique name for this workflow, and then click the check mark icon.
6. If you want this workflow to run on a schedule, click the **Schedule** button. In the **Repeat Run** dropdown list, select one of the scheduling options, and fill in the scheduling settings.
7. To overwrite any previously processed files, or to retry any documents that fail to process, click the **Settings** button, and check either or both of the boxes.
The **Reprocess All** box applies only to blob storage connectors such as the Amazon S3, Azure Blob Storage, and Google Cloud Storage connectors:
* Checking this box reprocesses all documents in the source location on every workflow run.
* Unchecking this box causes new documents that have been added to the source location, as well as existing documents in the source location that have had their contents or titles changed, since the last workflow run to be processed on future runs. Other previously processed documents are not processed again.
8. The workflow begins with the following layout:
```mermaid theme={null}
flowchart LR
Source-->Partitioner-->Destination
```
The following workflow layouts are also valid:
```mermaid theme={null}
flowchart LR
Source-->Partitioner-->Chunker-->Destination
```
```mermaid theme={null}
flowchart LR
Source-->Partitioner-->Chunker-->Embedder-->Destination
```
```mermaid theme={null}
flowchart LR
Source-->Partitioner-->Enrichment-->Chunker-->Destination
```
```mermaid theme={null}
flowchart LR
Source-->Partitioner-->Enrichment-->Chunker-->Embedder-->Destination
```
9. In the pipeline designer, click the **Source** node. In the **Source** pane, select the source location. Then click **Save**.
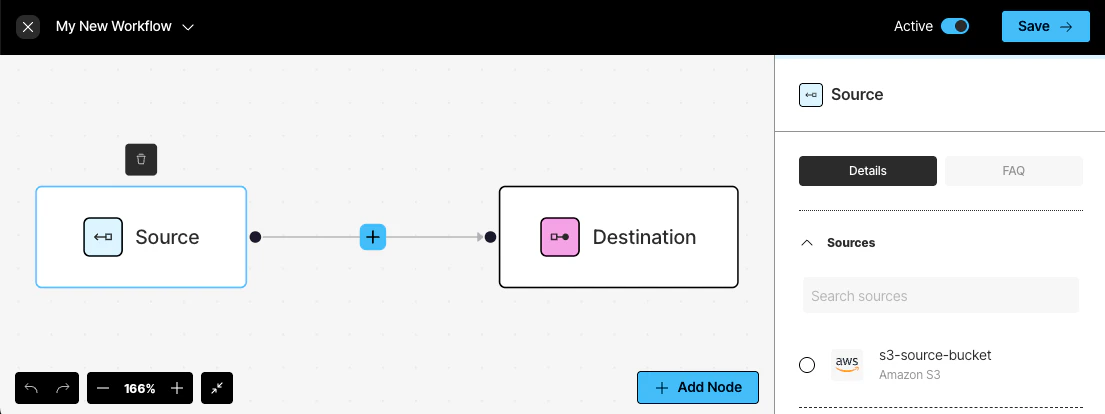 10. Click the **Destination** node. In the **Destination** pane, select the destination location. Then click **Save**.
11. As needed, add more nodes by clicking the plus icon (recommended) or **Add Node** button:
10. Click the **Destination** node. In the **Destination** pane, select the destination location. Then click **Save**.
11. As needed, add more nodes by clicking the plus icon (recommended) or **Add Node** button:
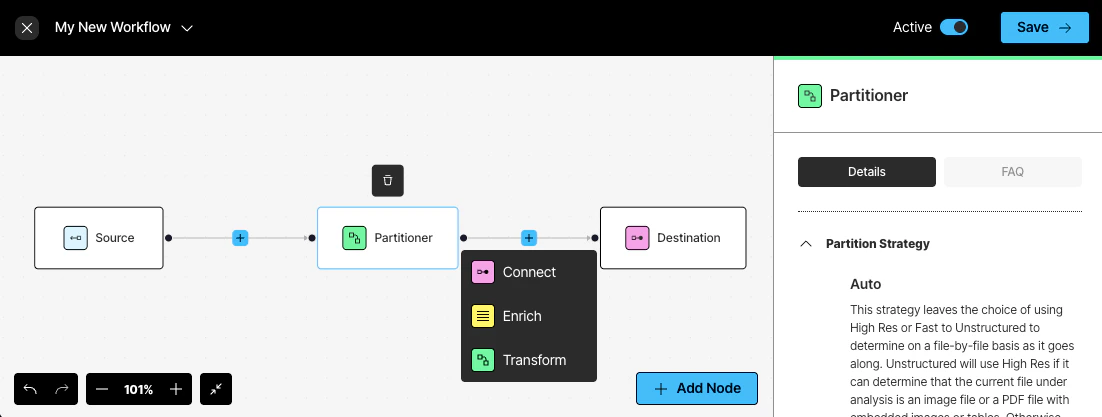 * Click **Connect** to add another **Source** or **Destination** node. You can add multiple source and destination locations. Files will be ingested from all of the source locations, and the processed data will be delivered to all of the destination locations. [Learn more](#custom-workflow-node-types).
* Click **Enrich** to add a **Chunker** or **Enrichment** node. [Learn more](#custom-workflow-node-types).
* Click **Transform** to add a **Partitioner** or **Embedder** node. [Learn more](#custom-workflow-node-types).
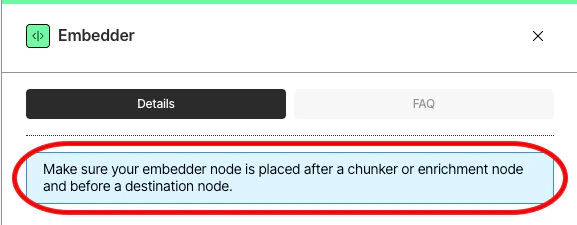
Make sure to add nodes in the correct order. If you are unsure, see the usage hints in the blue note that appears
in the node's settings pane.
* Click **Connect** to add another **Source** or **Destination** node. You can add multiple source and destination locations. Files will be ingested from all of the source locations, and the processed data will be delivered to all of the destination locations. [Learn more](#custom-workflow-node-types).
* Click **Enrich** to add a **Chunker** or **Enrichment** node. [Learn more](#custom-workflow-node-types).
* Click **Transform** to add a **Partitioner** or **Embedder** node. [Learn more](#custom-workflow-node-types).
Make sure to add nodes in the correct order. If you are unsure, see the usage hints in the blue note that appears
in the node's settings pane.
 To edit a node, click that node, and then change its settings.
To delete a node, click that node, and then click the trash can icon above it.
12. Click **Save**.
13. If you did not set the workflow to run on a schedule, you can [run the worklow](#edit-delete-or-run-a-workflow) now.
#### Custom workflow node types
Choose from one of four available partitioning strategies.
Unstructured recommends that you choose the **Auto** partitioning strategy in most cases. With **Auto**, Unstructured does all
the heavy lifting, optimizing at runtime for the highest quality at the lowest cost page-by-page.
You should consider the following additional strategies only if you are absolutely sure that your documents are of the same
type. Each of the following strategies are best suited for specific situations. Choosing one of these
strategies other than **Auto** for sets of documents of different types could produce undesirable results,
including reduction in transformation quality.
* **VLM**: For the highest-quality transformation of these file types: `.bmp`, `.gif`, `.heic`, `.jpeg`, `.jpg`, `.pdf`, `.png`, `.tiff`, and `.webp`.
* **High Res**: For all other [supported file types](/ui/supported-file-types), and for the generation of bounding box coordinates.
* **Fast**: For text-only documents.
For **VLM**, you must also choose a VLM provider and model. Available choices include:
* **Anthropic**:
* **Anthropic Claude 3.5 Sonnet**
* **OpenAI**:
* **OpenAI GPT-4o**
* **Amazon Bedrock**:
* **Anthropic Claude 3.5 Sonnet**
* **Anthropic Claude 3 Opus**
* **Anthropic Claude 3 Haiku**
* **Anthropic Claude 3 Sonnet**
* **Amazon Nova Pro**
* **Amazon Nova Lite**
* **Meta Llama 3.2 90B Instruct**
* **Meta Llama 3.2 11B Instruct**
* **Vertex AI**:
* **Gemini 2.0 Flash**
When you use the **VLM** strategy with embeddings for PDF files of 200 or more pages, you might notice some errors when
these files are processed. These errors typically occur when these larger PDF files have lots of tables and high-resolution images.
[Learn more](/ui/partitioning).
For **Chunkers**, select one of the following:
* **Chunk by title**: Preserve section boundaries and optionally page boundaries as well. A single chunk will never contain text that occurred in two different sections. When a new section starts, the existing chunk is closed and a new one is started, even if the next element would fit in the prior chunk. Also, specify the following:
* **Contextual chunking**: When switched on, prepends chunk-specific explanatory context to each chunk. [Learn more](/ui/chunking#contextual-chunking).
* **Combine text under n chars**: Combine elements until a section reaches a length of this many characters. The default is **0**.
* **Include original elements**: Check this box to output the elements that were used to form a chunk, to appear in the `metadata` field's `orig_elements` field for that chunk. By default, this box is unchecked.
* **Max characters**: Cut off new sections after reaching a length of this many characters. This is a strict limit. The default is **2048**.
* **Multipage sections**: Check this box to allow sections to span multiple pages. By default, this box is unchecked.
* **New after n chars**: Cut off new sections after reaching a length of this many characters. This is an approximate limit. The default is \**1500*.
* **Overlap**: Apply a prefix of this many trailing characters from the prior text-split chunk to second and later chunks formed from oversized elements by text-splitting. The default is **160**.
* **Overlap all**: Check this box to apply overlap to "normal" chunks formed by combining whole elements. Use with caution as this can introduce noise into otherwise clean semantic units. By default, this box is unchecked.
* **Chunk by character** (also known as *basic* chunking): Combine sequential elements to maximally fill each chunk. Also, specify the following:
* **Contextual chunking**: When switched on, prepends chunk-specific explanatory context to each chunk. [Learn more](/ui/chunking#contextual-chunking).
* **Include original elements**: Check this box to output the elements that were used to form a chunk, to appear in the `metadata` field's `orig_elements` field for that chunk. By default, this box is unchecked.
* **Max characters**: Cut off new sections after reaching a length of this many characters. The default is **2048**.
* **New after n chars**: Cut off new sections after reaching a length of this many characters. This is an approximate limit. The default is \**1500*.
* **Overlap**: Apply a prefix of this many trailing characters from the prior text-split chunk to second and later chunks formed from oversized elements by text-splitting. The default is **160**.
* **Overlap All**: Check this box to apply overlap to "normal" chunks formed by combining whole elements. Use with caution as this can introduce noise into otherwise clean semantic units. By default, this box is unchecked.
* **Chunk by page**: Preserve page boundaries. When a new page is detected, the existing chunk is closed and a new one is started, even if the next element would fit in the prior chunk. Also, specify the following:
* **Contextual chunking**: When switched on, prepends chunk-specific explanatory context to each chunk. [Learn more](/ui/chunking#contextual-chunking).
* **Include original elements**: Check this box to output the elements that were used to form a chunk, to appear in the `metadata` field's `orig_elements` field for that chunk. By default, this box is unchecked.
* **Max characters**: Cut off new sections after reaching a length of this many characters. This is a strict limit. The default is **500**.
* **New after n chars**: Cut off new sections after reaching a length of this many characters. This is an approximate limit. The default is **50**.
* **Overlap**: Apply a prefix of this many trailing characters from the prior text-split chunk to second and later chunks formed from oversized elements by text-splitting. The default is **30**.
* **Overlap all**: Check this box to apply overlap to "normal" chunks formed by combining whole elements. Use with caution as this can introduce noise into otherwise clean semantic units. By default, this box is unchecked.
* **Chunk by similarity**: Use the [sentence-transformers/multi-qa-mpnet-base-dot-v1](https://huggingface.co/sentence-transformers/multi-qa-mpnet-base-dot-v1) embedding model to identify topically similar sequential elements and combine them into chunks. Also, specify the following:
* **Contextual chunking**: When switched on, prepends chunk-specific explanatory context to each chunk. [Learn more](/ui/chunking#contextual-chunking).
* **Include original elements**: Check this box to output the elements that were used to form a chunk, to appear in the `metadata` field's `orig_elements` field for that chunk. By default, this box is unchecked.
* **Max characters**: Cut off new sections after reaching a length of this many characters. This is a strict limit. The default is **500**.
* **Similarity threshold**: Specify a threshold between 0 and 1 exclusive (0.01 to 0.99 inclusive), where 0 indicates completely dissimilar vectors and 1 indicates identical vectors, taking into consider the trade-offs between precision (a higher threshold) and recall (a lower threshold). The default is **0.5**. [Learn more](https://towardsdatascience.com/introduction-to-embedding-clustering-and-similarity-11dd80b00061).
Learn more:
* [Chunking overview](/ui/chunking)
* [Chunking for RAG: best practices](https://unstructured.io/blog/chunking-for-rag-best-practices)
Choose one of the following:
* **Image** to summarize images. Also select one of the following provider (and model) combinations to use:
* **OpenAI (GPT-4o)**. [Learn more](https://openai.com/index/hello-gpt-4o/).
* **Anthropic (Claude 3.5 Sonnet)**. [Learn more](https://www.anthropic.com/news/claude-3-5-sonnet).
* **Amazon Bedrock (Claude 3.5 Sonnet)**. [Learn more](https://aws.amazon.com/bedrock/claude/).
* **Vertex AI (Gemini 2.0 Flash)**. [Learn more](https://cloud.google.com/vertex-ai/generative-ai/docs/gemini-v2).
[Learn more](/ui/enriching/image-descriptions).
* **Table** to summarize tables. Also select one of the following provider (and model) combinations to use:
* **OpenAI (GPT-4o)**. [Learn more](https://openai.com/index/hello-gpt-4o/).
* **Anthropic (Claude 3.5 Sonnet)**. [Learn more](https://www.anthropic.com/news/claude-3-5-sonnet).
* **Amazon Bedrock (Claude 3.5 Sonnet)**. [Learn more](https://aws.amazon.com/bedrock/claude/).
* **Vertex AI (Gemini 2.0 Flash)**. [Learn more](https://cloud.google.com/vertex-ai/generative-ai/docs/gemini-v2).
Make sure after you choose the provider and model, that **Table Description** is also displayed. If **Table Description** and **Table to HTML** are both
displayed, be sure to select **Table Description**.
[Learn more](/ui/enriching/table-descriptions).
* **Table** to convert tables to HTML. Also select one of the following provider (and model) combinations to use:
* **OpenAI (GPT-4o)**. [Learn more](https://openai.com/index/hello-gpt-4o/).
Make sure after you choose this provider and model, that **Table to HTML** is also selected.
[Learn more](/ui/enriching/table-to-html).
* **Text** to generate a list of recognized entities and their types by using a technique called *named entity recognition* (NER).
Also select one of the following provider (and model) combinations to use:
* **OpenAI (GPT-4o)**. [Learn more](https://openai.com/index/hello-gpt-4o/).
* **Anthropic (Claude 3.5 Sonnet)**. [Learn more](https://www.anthropic.com/news/claude-3-5-sonnet).
[Learn more](/ui/enriching/ner).
For **Select Embedding Model**, select one of the following:
* **Azure OpenAI**: Use Azure OpenAI to generate embeddings with one of the following models:
* **text-embedding-3-small**, with 1536 dimensions.
* **text-embedding-3-large**, with 3072 dimensions.
* **Ada 002 (Text)** (`text-embedding-ada-002`), with 1536 dimensions.
[Learn more](https://learn.microsoft.com/azure/ai-services/openai/concepts/models#embeddings).
* **Amazon Bedrock**: Use Amazon Bedrock to generate embeddings with one of the following models:
* **Titan Text Embeddings V2**, with 1024 dimensions. [Learn more](https://docs.aws.amazon.com/bedrock/latest/userguide/titan-embedding-models.html).
* **Titan Embeddings G1 - Text**, with 1536 dimensions. [Learn more](https://docs.aws.amazon.com/bedrock/latest/userguide/titan-embedding-models.html).
* **Titan Multimodal Embeddings G1**, with 1024 dimensions. [Learn more](https://docs.aws.amazon.com/bedrock/latest/userguide/titan-multiemb-models.html).
* **Cohere Embed English**, with 1024 dimensions. [Learn more](https://docs.aws.amazon.com/bedrock/latest/userguide/model-parameters-embed.html).
* **Cohere Embed Multilingual**, with 1024 dimensions. [Learn more](https://docs.aws.amazon.com/bedrock/latest/userguide/model-parameters-embed.html).
* **TogetherAI**: Use TogetherAI to generate embeddings with one of the following models:
* **M2-BERT-80M-2K-Retrieval**, with 768 dimensions.
* **M2-BERT-80M-8K-Retrieval**, with 768 dimensions.
* **M2-BERT-80M-32K-Retrieval**, with 768 dimensions.
[Learn more](https://docs.together.ai/docs/serverless-models#embedding-models).
* **Voyage AI**: Use Voyage AI to generate embeddings with one of the following models:
* **voyage-code-2**, with 1536 dimensions.
* **voyage-3**, with 1024 dimensions.
* **voyage-3-large**, with 1024 dimensions.
* **voyage-3-lite**, with 512 dimensions.
* **voyage-code-3**, with 1024 dimensions.
* **voyage-finance-2**, with 1024 dimensions.
* **voyage-law-2**, with 1024 dimensions.
* **voyage-multimodal-3**, with 1024 dimensions.
[Learn more](https://docs.voyageai.com/docs/embeddings).
Learn more:
* [Embedding overview](/ui/embedding)
* [Understanding embedding models: make an informed choice for your RAG](https://unstructured.io/blog/understanding-embedding-models-make-an-informed-choice-for-your-rag).
## Edit, delete, or run a workflow
To run a workflow once, manually:
1. On the sidebar, click **Workflows**.
2. In the list of workflows, click **Run** in the row for the workflow that you want to run.
For each of the workflows on the **Workflows** list page, the following actions are available by clicking the ellipses (the three dots) in the row for the respective workflow:
* **Edit via Form**: Changes the existing configuration of your workflow.
* **Delete**: Removes the workflow from the platform. Use this action cautiously, as it will permanently delete the workflow and its configurations.
* **Open**: Opens the workflow's settings page.
## Pause a scheduled workflow
To stop running a workflow that is set to run on a repeating schedule:
1. On the sidebar, click **Workflows**.
2. In the list of workflows, turn off the **Status** toggle in the row for the workflow that you want to stop running on a repeated schedule.
Turning off the **Status** toggle also disables the workflow's **Run** button, which prevents that workflow from being run manually as well.
To resume running the workflow on its original repeating schedule, as well as enable the workflow to be run manually as needed, turn on the workflow's **Status** toggle.
To edit a node, click that node, and then change its settings.
To delete a node, click that node, and then click the trash can icon above it.
12. Click **Save**.
13. If you did not set the workflow to run on a schedule, you can [run the worklow](#edit-delete-or-run-a-workflow) now.
#### Custom workflow node types
Choose from one of four available partitioning strategies.
Unstructured recommends that you choose the **Auto** partitioning strategy in most cases. With **Auto**, Unstructured does all
the heavy lifting, optimizing at runtime for the highest quality at the lowest cost page-by-page.
You should consider the following additional strategies only if you are absolutely sure that your documents are of the same
type. Each of the following strategies are best suited for specific situations. Choosing one of these
strategies other than **Auto** for sets of documents of different types could produce undesirable results,
including reduction in transformation quality.
* **VLM**: For the highest-quality transformation of these file types: `.bmp`, `.gif`, `.heic`, `.jpeg`, `.jpg`, `.pdf`, `.png`, `.tiff`, and `.webp`.
* **High Res**: For all other [supported file types](/ui/supported-file-types), and for the generation of bounding box coordinates.
* **Fast**: For text-only documents.
For **VLM**, you must also choose a VLM provider and model. Available choices include:
* **Anthropic**:
* **Anthropic Claude 3.5 Sonnet**
* **OpenAI**:
* **OpenAI GPT-4o**
* **Amazon Bedrock**:
* **Anthropic Claude 3.5 Sonnet**
* **Anthropic Claude 3 Opus**
* **Anthropic Claude 3 Haiku**
* **Anthropic Claude 3 Sonnet**
* **Amazon Nova Pro**
* **Amazon Nova Lite**
* **Meta Llama 3.2 90B Instruct**
* **Meta Llama 3.2 11B Instruct**
* **Vertex AI**:
* **Gemini 2.0 Flash**
When you use the **VLM** strategy with embeddings for PDF files of 200 or more pages, you might notice some errors when
these files are processed. These errors typically occur when these larger PDF files have lots of tables and high-resolution images.
[Learn more](/ui/partitioning).
For **Chunkers**, select one of the following:
* **Chunk by title**: Preserve section boundaries and optionally page boundaries as well. A single chunk will never contain text that occurred in two different sections. When a new section starts, the existing chunk is closed and a new one is started, even if the next element would fit in the prior chunk. Also, specify the following:
* **Contextual chunking**: When switched on, prepends chunk-specific explanatory context to each chunk. [Learn more](/ui/chunking#contextual-chunking).
* **Combine text under n chars**: Combine elements until a section reaches a length of this many characters. The default is **0**.
* **Include original elements**: Check this box to output the elements that were used to form a chunk, to appear in the `metadata` field's `orig_elements` field for that chunk. By default, this box is unchecked.
* **Max characters**: Cut off new sections after reaching a length of this many characters. This is a strict limit. The default is **2048**.
* **Multipage sections**: Check this box to allow sections to span multiple pages. By default, this box is unchecked.
* **New after n chars**: Cut off new sections after reaching a length of this many characters. This is an approximate limit. The default is \**1500*.
* **Overlap**: Apply a prefix of this many trailing characters from the prior text-split chunk to second and later chunks formed from oversized elements by text-splitting. The default is **160**.
* **Overlap all**: Check this box to apply overlap to "normal" chunks formed by combining whole elements. Use with caution as this can introduce noise into otherwise clean semantic units. By default, this box is unchecked.
* **Chunk by character** (also known as *basic* chunking): Combine sequential elements to maximally fill each chunk. Also, specify the following:
* **Contextual chunking**: When switched on, prepends chunk-specific explanatory context to each chunk. [Learn more](/ui/chunking#contextual-chunking).
* **Include original elements**: Check this box to output the elements that were used to form a chunk, to appear in the `metadata` field's `orig_elements` field for that chunk. By default, this box is unchecked.
* **Max characters**: Cut off new sections after reaching a length of this many characters. The default is **2048**.
* **New after n chars**: Cut off new sections after reaching a length of this many characters. This is an approximate limit. The default is \**1500*.
* **Overlap**: Apply a prefix of this many trailing characters from the prior text-split chunk to second and later chunks formed from oversized elements by text-splitting. The default is **160**.
* **Overlap All**: Check this box to apply overlap to "normal" chunks formed by combining whole elements. Use with caution as this can introduce noise into otherwise clean semantic units. By default, this box is unchecked.
* **Chunk by page**: Preserve page boundaries. When a new page is detected, the existing chunk is closed and a new one is started, even if the next element would fit in the prior chunk. Also, specify the following:
* **Contextual chunking**: When switched on, prepends chunk-specific explanatory context to each chunk. [Learn more](/ui/chunking#contextual-chunking).
* **Include original elements**: Check this box to output the elements that were used to form a chunk, to appear in the `metadata` field's `orig_elements` field for that chunk. By default, this box is unchecked.
* **Max characters**: Cut off new sections after reaching a length of this many characters. This is a strict limit. The default is **500**.
* **New after n chars**: Cut off new sections after reaching a length of this many characters. This is an approximate limit. The default is **50**.
* **Overlap**: Apply a prefix of this many trailing characters from the prior text-split chunk to second and later chunks formed from oversized elements by text-splitting. The default is **30**.
* **Overlap all**: Check this box to apply overlap to "normal" chunks formed by combining whole elements. Use with caution as this can introduce noise into otherwise clean semantic units. By default, this box is unchecked.
* **Chunk by similarity**: Use the [sentence-transformers/multi-qa-mpnet-base-dot-v1](https://huggingface.co/sentence-transformers/multi-qa-mpnet-base-dot-v1) embedding model to identify topically similar sequential elements and combine them into chunks. Also, specify the following:
* **Contextual chunking**: When switched on, prepends chunk-specific explanatory context to each chunk. [Learn more](/ui/chunking#contextual-chunking).
* **Include original elements**: Check this box to output the elements that were used to form a chunk, to appear in the `metadata` field's `orig_elements` field for that chunk. By default, this box is unchecked.
* **Max characters**: Cut off new sections after reaching a length of this many characters. This is a strict limit. The default is **500**.
* **Similarity threshold**: Specify a threshold between 0 and 1 exclusive (0.01 to 0.99 inclusive), where 0 indicates completely dissimilar vectors and 1 indicates identical vectors, taking into consider the trade-offs between precision (a higher threshold) and recall (a lower threshold). The default is **0.5**. [Learn more](https://towardsdatascience.com/introduction-to-embedding-clustering-and-similarity-11dd80b00061).
Learn more:
* [Chunking overview](/ui/chunking)
* [Chunking for RAG: best practices](https://unstructured.io/blog/chunking-for-rag-best-practices)
Choose one of the following:
* **Image** to summarize images. Also select one of the following provider (and model) combinations to use:
* **OpenAI (GPT-4o)**. [Learn more](https://openai.com/index/hello-gpt-4o/).
* **Anthropic (Claude 3.5 Sonnet)**. [Learn more](https://www.anthropic.com/news/claude-3-5-sonnet).
* **Amazon Bedrock (Claude 3.5 Sonnet)**. [Learn more](https://aws.amazon.com/bedrock/claude/).
* **Vertex AI (Gemini 2.0 Flash)**. [Learn more](https://cloud.google.com/vertex-ai/generative-ai/docs/gemini-v2).
[Learn more](/ui/enriching/image-descriptions).
* **Table** to summarize tables. Also select one of the following provider (and model) combinations to use:
* **OpenAI (GPT-4o)**. [Learn more](https://openai.com/index/hello-gpt-4o/).
* **Anthropic (Claude 3.5 Sonnet)**. [Learn more](https://www.anthropic.com/news/claude-3-5-sonnet).
* **Amazon Bedrock (Claude 3.5 Sonnet)**. [Learn more](https://aws.amazon.com/bedrock/claude/).
* **Vertex AI (Gemini 2.0 Flash)**. [Learn more](https://cloud.google.com/vertex-ai/generative-ai/docs/gemini-v2).
Make sure after you choose the provider and model, that **Table Description** is also displayed. If **Table Description** and **Table to HTML** are both
displayed, be sure to select **Table Description**.
[Learn more](/ui/enriching/table-descriptions).
* **Table** to convert tables to HTML. Also select one of the following provider (and model) combinations to use:
* **OpenAI (GPT-4o)**. [Learn more](https://openai.com/index/hello-gpt-4o/).
Make sure after you choose this provider and model, that **Table to HTML** is also selected.
[Learn more](/ui/enriching/table-to-html).
* **Text** to generate a list of recognized entities and their types by using a technique called *named entity recognition* (NER).
Also select one of the following provider (and model) combinations to use:
* **OpenAI (GPT-4o)**. [Learn more](https://openai.com/index/hello-gpt-4o/).
* **Anthropic (Claude 3.5 Sonnet)**. [Learn more](https://www.anthropic.com/news/claude-3-5-sonnet).
[Learn more](/ui/enriching/ner).
For **Select Embedding Model**, select one of the following:
* **Azure OpenAI**: Use Azure OpenAI to generate embeddings with one of the following models:
* **text-embedding-3-small**, with 1536 dimensions.
* **text-embedding-3-large**, with 3072 dimensions.
* **Ada 002 (Text)** (`text-embedding-ada-002`), with 1536 dimensions.
[Learn more](https://learn.microsoft.com/azure/ai-services/openai/concepts/models#embeddings).
* **Amazon Bedrock**: Use Amazon Bedrock to generate embeddings with one of the following models:
* **Titan Text Embeddings V2**, with 1024 dimensions. [Learn more](https://docs.aws.amazon.com/bedrock/latest/userguide/titan-embedding-models.html).
* **Titan Embeddings G1 - Text**, with 1536 dimensions. [Learn more](https://docs.aws.amazon.com/bedrock/latest/userguide/titan-embedding-models.html).
* **Titan Multimodal Embeddings G1**, with 1024 dimensions. [Learn more](https://docs.aws.amazon.com/bedrock/latest/userguide/titan-multiemb-models.html).
* **Cohere Embed English**, with 1024 dimensions. [Learn more](https://docs.aws.amazon.com/bedrock/latest/userguide/model-parameters-embed.html).
* **Cohere Embed Multilingual**, with 1024 dimensions. [Learn more](https://docs.aws.amazon.com/bedrock/latest/userguide/model-parameters-embed.html).
* **TogetherAI**: Use TogetherAI to generate embeddings with one of the following models:
* **M2-BERT-80M-2K-Retrieval**, with 768 dimensions.
* **M2-BERT-80M-8K-Retrieval**, with 768 dimensions.
* **M2-BERT-80M-32K-Retrieval**, with 768 dimensions.
[Learn more](https://docs.together.ai/docs/serverless-models#embedding-models).
* **Voyage AI**: Use Voyage AI to generate embeddings with one of the following models:
* **voyage-code-2**, with 1536 dimensions.
* **voyage-3**, with 1024 dimensions.
* **voyage-3-large**, with 1024 dimensions.
* **voyage-3-lite**, with 512 dimensions.
* **voyage-code-3**, with 1024 dimensions.
* **voyage-finance-2**, with 1024 dimensions.
* **voyage-law-2**, with 1024 dimensions.
* **voyage-multimodal-3**, with 1024 dimensions.
[Learn more](https://docs.voyageai.com/docs/embeddings).
Learn more:
* [Embedding overview](/ui/embedding)
* [Understanding embedding models: make an informed choice for your RAG](https://unstructured.io/blog/understanding-embedding-models-make-an-informed-choice-for-your-rag).
## Edit, delete, or run a workflow
To run a workflow once, manually:
1. On the sidebar, click **Workflows**.
2. In the list of workflows, click **Run** in the row for the workflow that you want to run.
For each of the workflows on the **Workflows** list page, the following actions are available by clicking the ellipses (the three dots) in the row for the respective workflow:
* **Edit via Form**: Changes the existing configuration of your workflow.
* **Delete**: Removes the workflow from the platform. Use this action cautiously, as it will permanently delete the workflow and its configurations.
* **Open**: Opens the workflow's settings page.
## Pause a scheduled workflow
To stop running a workflow that is set to run on a repeating schedule:
1. On the sidebar, click **Workflows**.
2. In the list of workflows, turn off the **Status** toggle in the row for the workflow that you want to stop running on a repeated schedule.
Turning off the **Status** toggle also disables the workflow's **Run** button, which prevents that workflow from being run manually as well.
To resume running the workflow on its original repeating schedule, as well as enable the workflow to be run manually as needed, turn on the workflow's **Status** toggle.